Technical bits - Houdini 21.0 Copernicus Ceramic Material Test
An overview of my workflow for creating a ceramic material from textures generated with Copernicus in Houdini 21.0 (and a bonus procedural ceramic mesh).
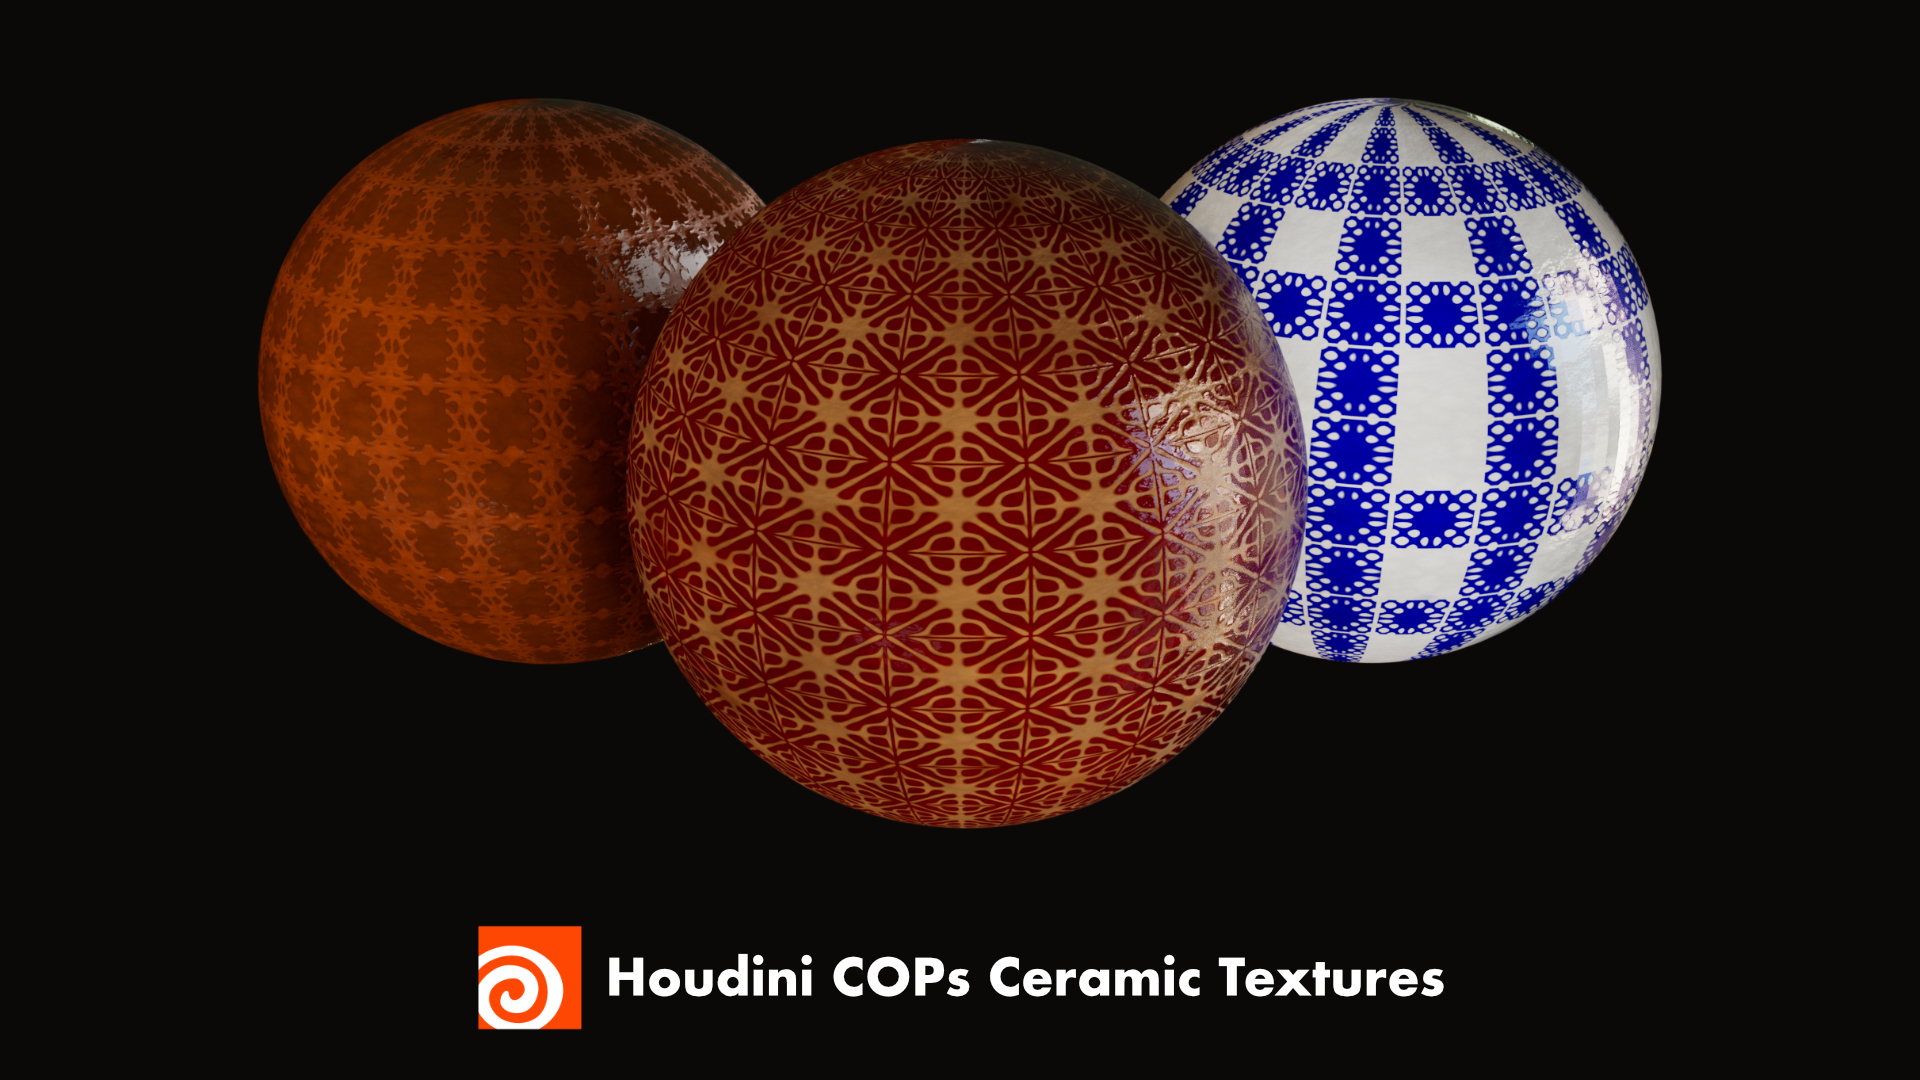
For a complete view of the project you can check out my ArtStation.
This article is split in two main sections: the procedural mesh and the Copernicus material workflow. I mention the geometry first because I procedurally separated the mesh in two groups by selecting the primitives on the inside, which in turn allowed me to assign two different materials to the vase. If you're not interested in the geometry workflow, you can skip straight to the Copernicus part.
Procedural ceramic mesh with HDA
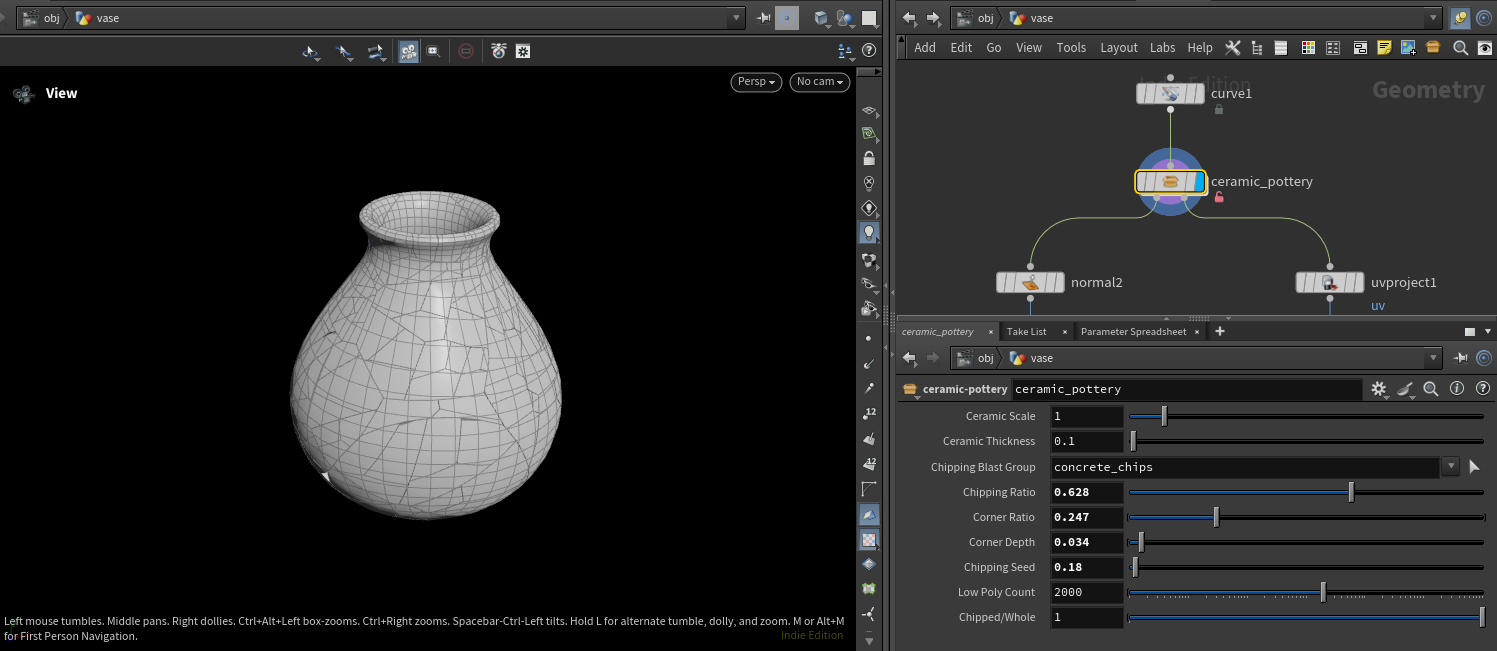
I built an HDA (Houdini Digital Asset) to generate the mesh of the ceramic piece, which includes a switch for a fractured version and an intact one. The workflow is quite simple:
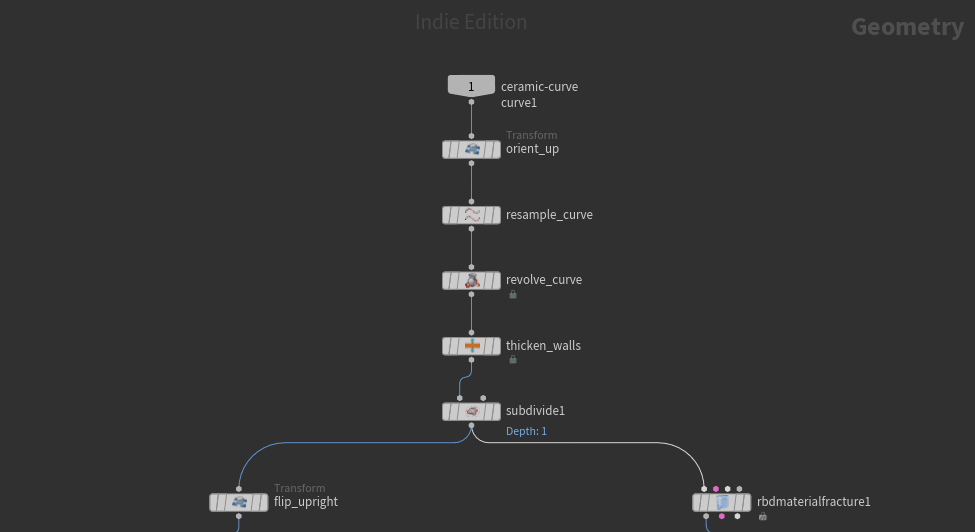
- The HDA takes one input (a curve), which defines the outer shape of the vase
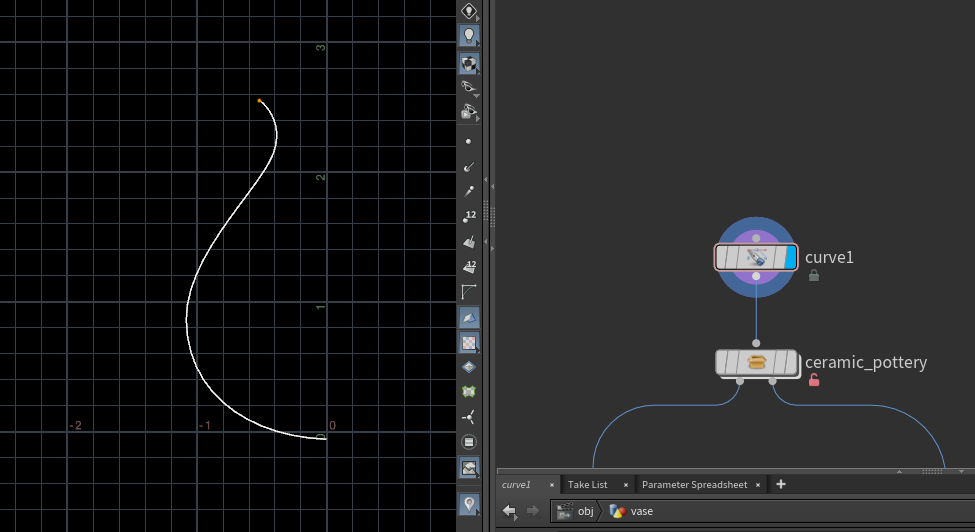
- The curve is resampled, thickened and revolved to generate the enclosed topology
-
I used a
quadremeshnode to decimate the mesh prior to fracturing in order to get it to the lowest possible poly count (the new quadremesh in Houdini 21.0 is incredible) -
To get the chipping and visible cracks on the fractured version I used an
rbdmaterialfracture, which generates different groups with the result of the fractured mesh (e.g. chipping-inside, chipping-outside etc.)
The resulting groups (of primitives) from the rbdmaterialfracture node are very useful for a variety of applications, but for my specific usecase the chipped primitives will be combined later with another group to allow me to apply the unglazed material to those "cracks" on the outside (despite the group containing mostly topology from inside the vase).
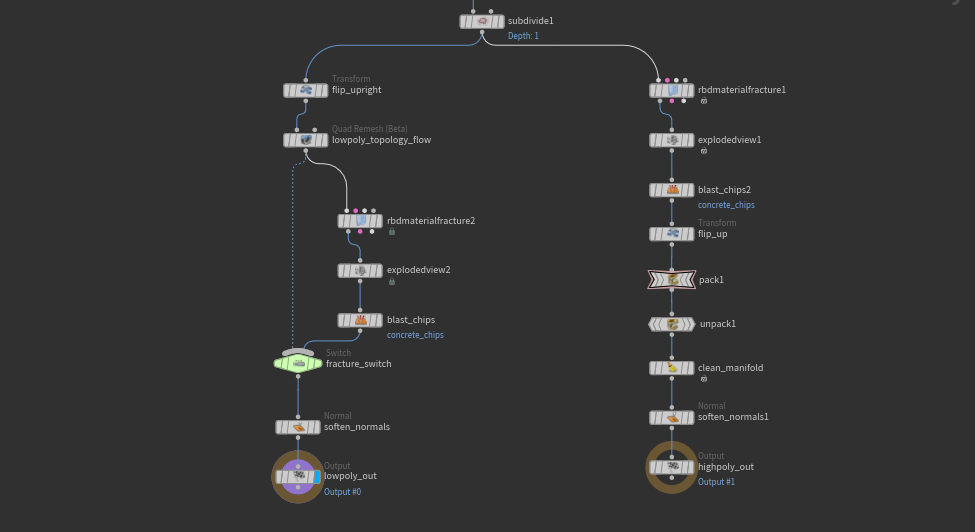
- Finally, I'm blasting the chips to create the cracked look, whilst leaving behind a group of the newly exposed primitives after the fracture
The HDA has two outputs: a low-poly version, with a switch for chipped/intact and a higher poly version, which could be useful for baking maps from high-poly to low-poly in the future (with software like xNormal, or even inside Houdini1).
The HDA itself includes a variety of useful parameters for customising the final mesh, such as:
• Chipping ratio and seed, to drive the amount of little pieces to be removed from the vase;
• Ceramic thickness;
• The poly count for the low-poly version;
Procedural primitive selection based on normals
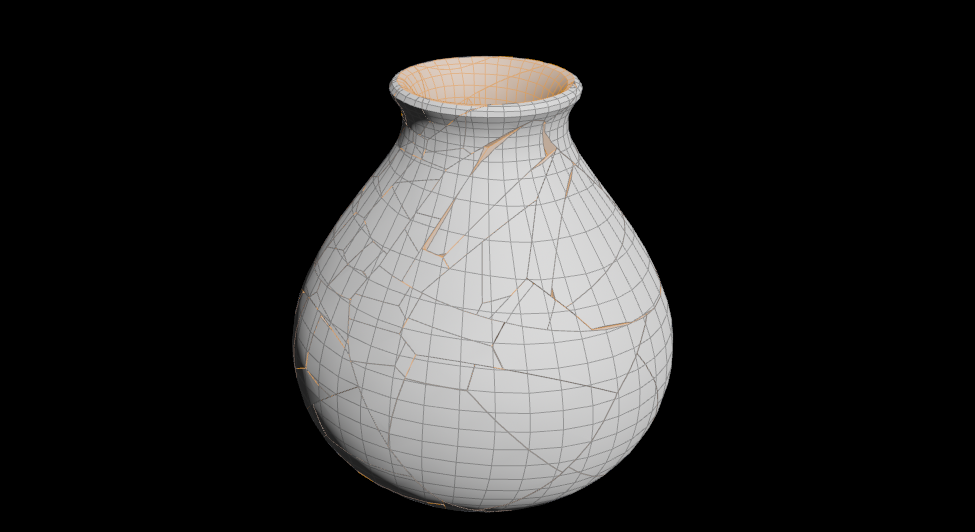
By the time I thought about this, I had finished the material and had all the texture maps ready. Then, while looking at a render, it sort of hit me – no one would hand paint (or in any way paint) the inside of a pot. It could be glazed entirely, yes, but not painstakingly painted to match the pattern on the outside.
Out of a desire for realism I had to find a way to separate the inside from the outside of the vase.
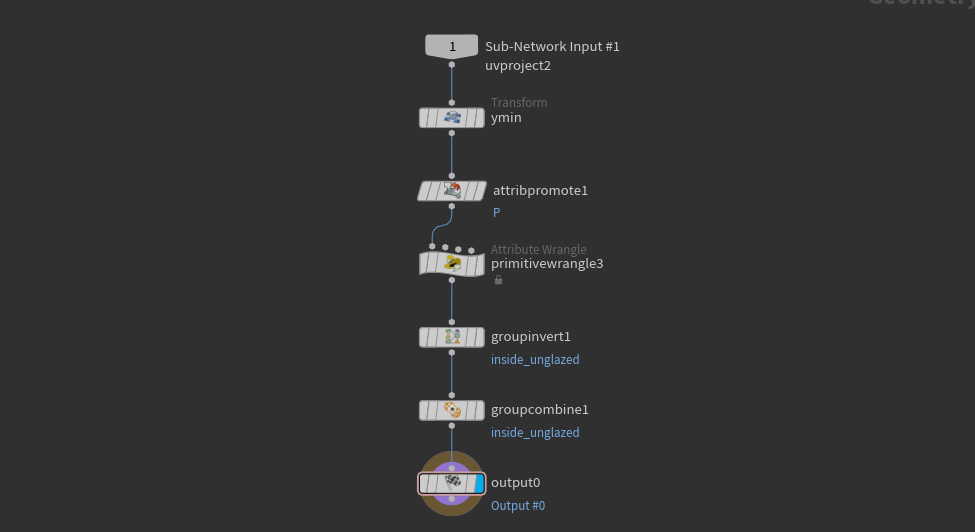
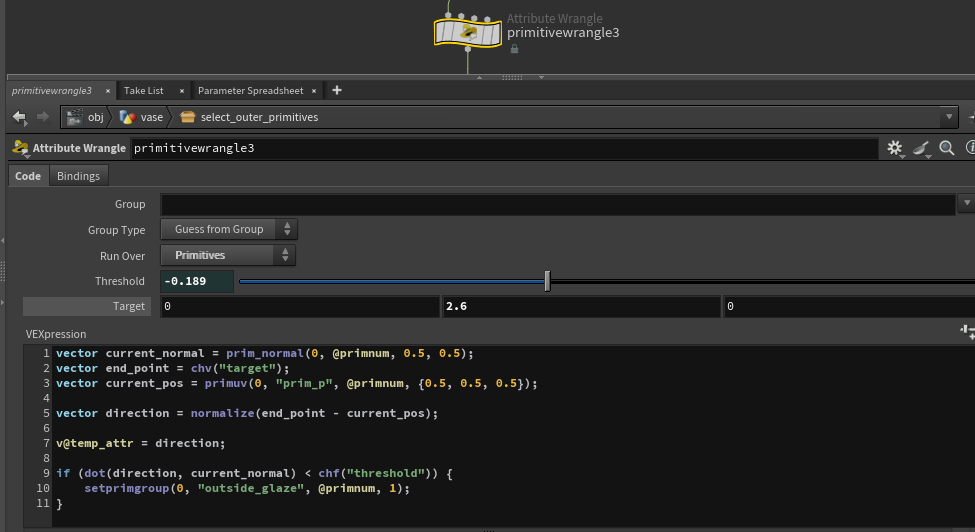
The VEX code in the primitivewrangle selects primitives based on the dot product between their normal and a vector pointing from the face towards the center of the mesh. If the dot product is negative, then the two vectors are pointing in opposite directions, therefore the faces are on the outside.
vector current_normal = prim_normal(0, @primnum, 0.5, 0.5);
vector end_point = chv("target");
vector current_pos = primuv(0, "prim_p", @primnum, {0.5, 0.5, 0.5});

vector direction = normalize(end_point - current_pos);

v@temp_attr = direction;

if (dot(direction, current_normal) < chf("threshold")) {
    setprimgroup(0, "outside_glaze", @primnum, 1);
}
With this logic, I selected those primitives whose normals point outwards and added them to a group (in my project called outside_glaze).
I mentioned earlier that the rbdmaterialfracture creates a group of primitives with the exposed faces from the chipping, including those faces in between cracks. Think about when you may have chipped a coffee cup or a plate – the cracks and chips are no longer glazed, but rough, like the unglazed underside. Well, now is the time to use that group to separate the mesh groups based on what material they will receive: glazed and unglazed.
-
The glazed part is made of the
outside_glazegroup. In this group all the faces are pointing outwards from the center of the geometry. -
The unglazed part will now be a group made of the inverted
outside_glaze(which gives us the inside of the vase) + therbdmaterialfracturechipping group, which includes the cracks and chips from everywhere else on the mesh.
With these two groups separated and later named accordingly with a name node, they can be individually shaded with their respective materials.
Note: for the following texturing part I made sure to UV map the mesh (in my case,a simple
uvprojectnode did the trick) and checked that the UVs were in good shape, otherwise the pattern would distort terribly. Another good note is that the newquadremeshnode worked wonders to make sure that I had good, usable topology for the low-poly mesh. This made both the separation into groups and the UV mapping that much easier. If you're not using Houdini to model your asset, you can most likely do all of this manually and don't require any of the geometry work I mentioned in this first half.
Copernicus Texture Workflow
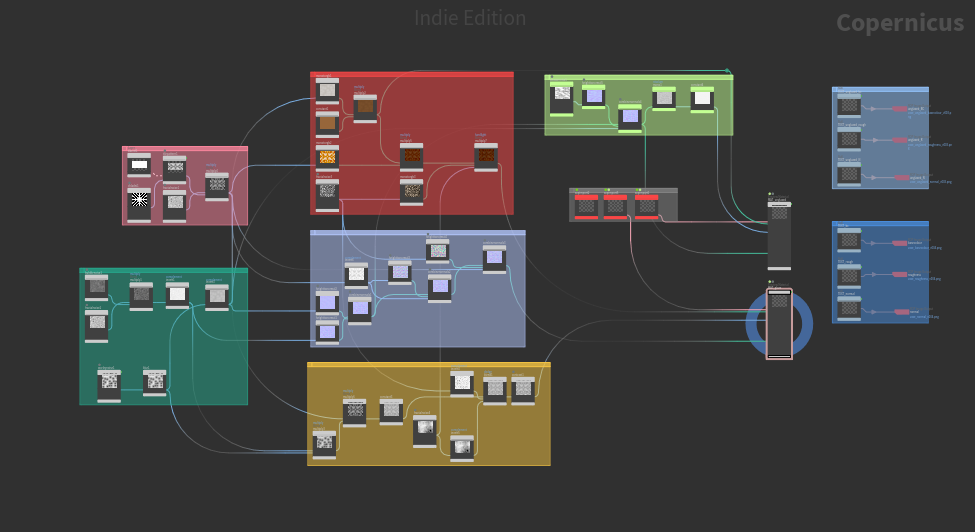
Before starting, I set the resolution of the COPs textures to 2k and I imported my geometry with a sopimport node so that I can visualise it later.
The entire COP network is driven primarly by the tiled pattern and several noises. From this network I extracted colour/albedo, normal and roughness texture maps since those were the only ones I needed for this type of ceramic material.
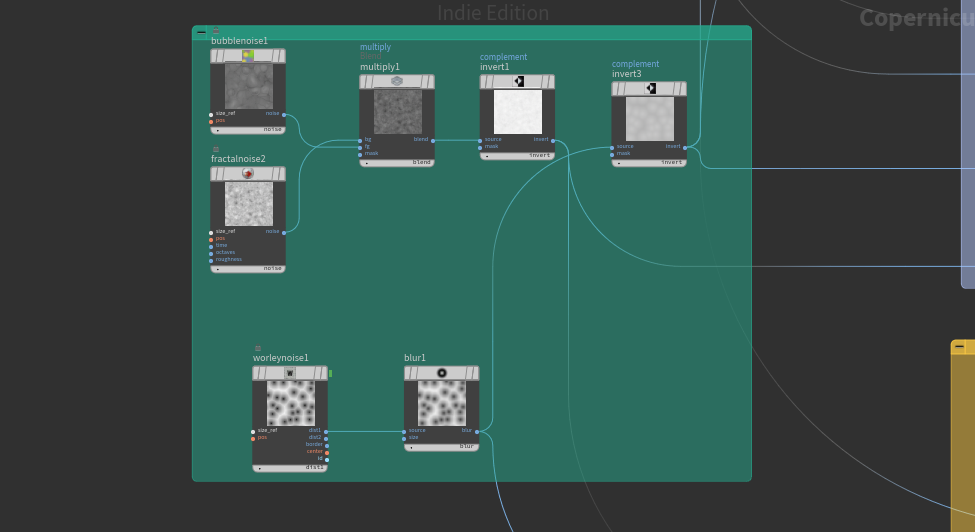
The pattern is made up of a chladni node tiled in various ways with a rectangular sizeref and a fractalnoise.
The Chladni pattern creates these beautiful organic shapes resembling flowers, perfect for making the kind of embelishments usually found on hand-painted pottery.

On top of the flowery pattern for the ceramic, I used a series of noises to create a larger area of variance. This I used later to drive the roughness, normal, dirt and some colour variation.
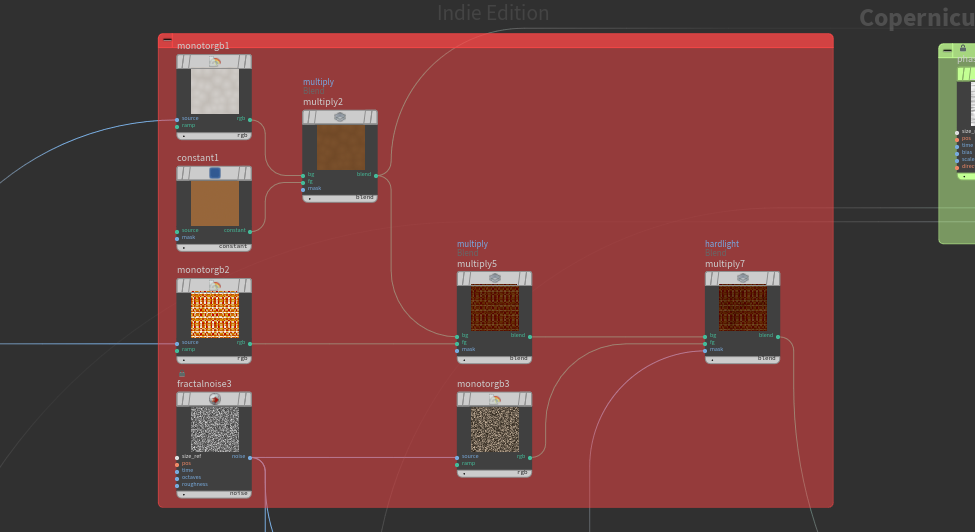
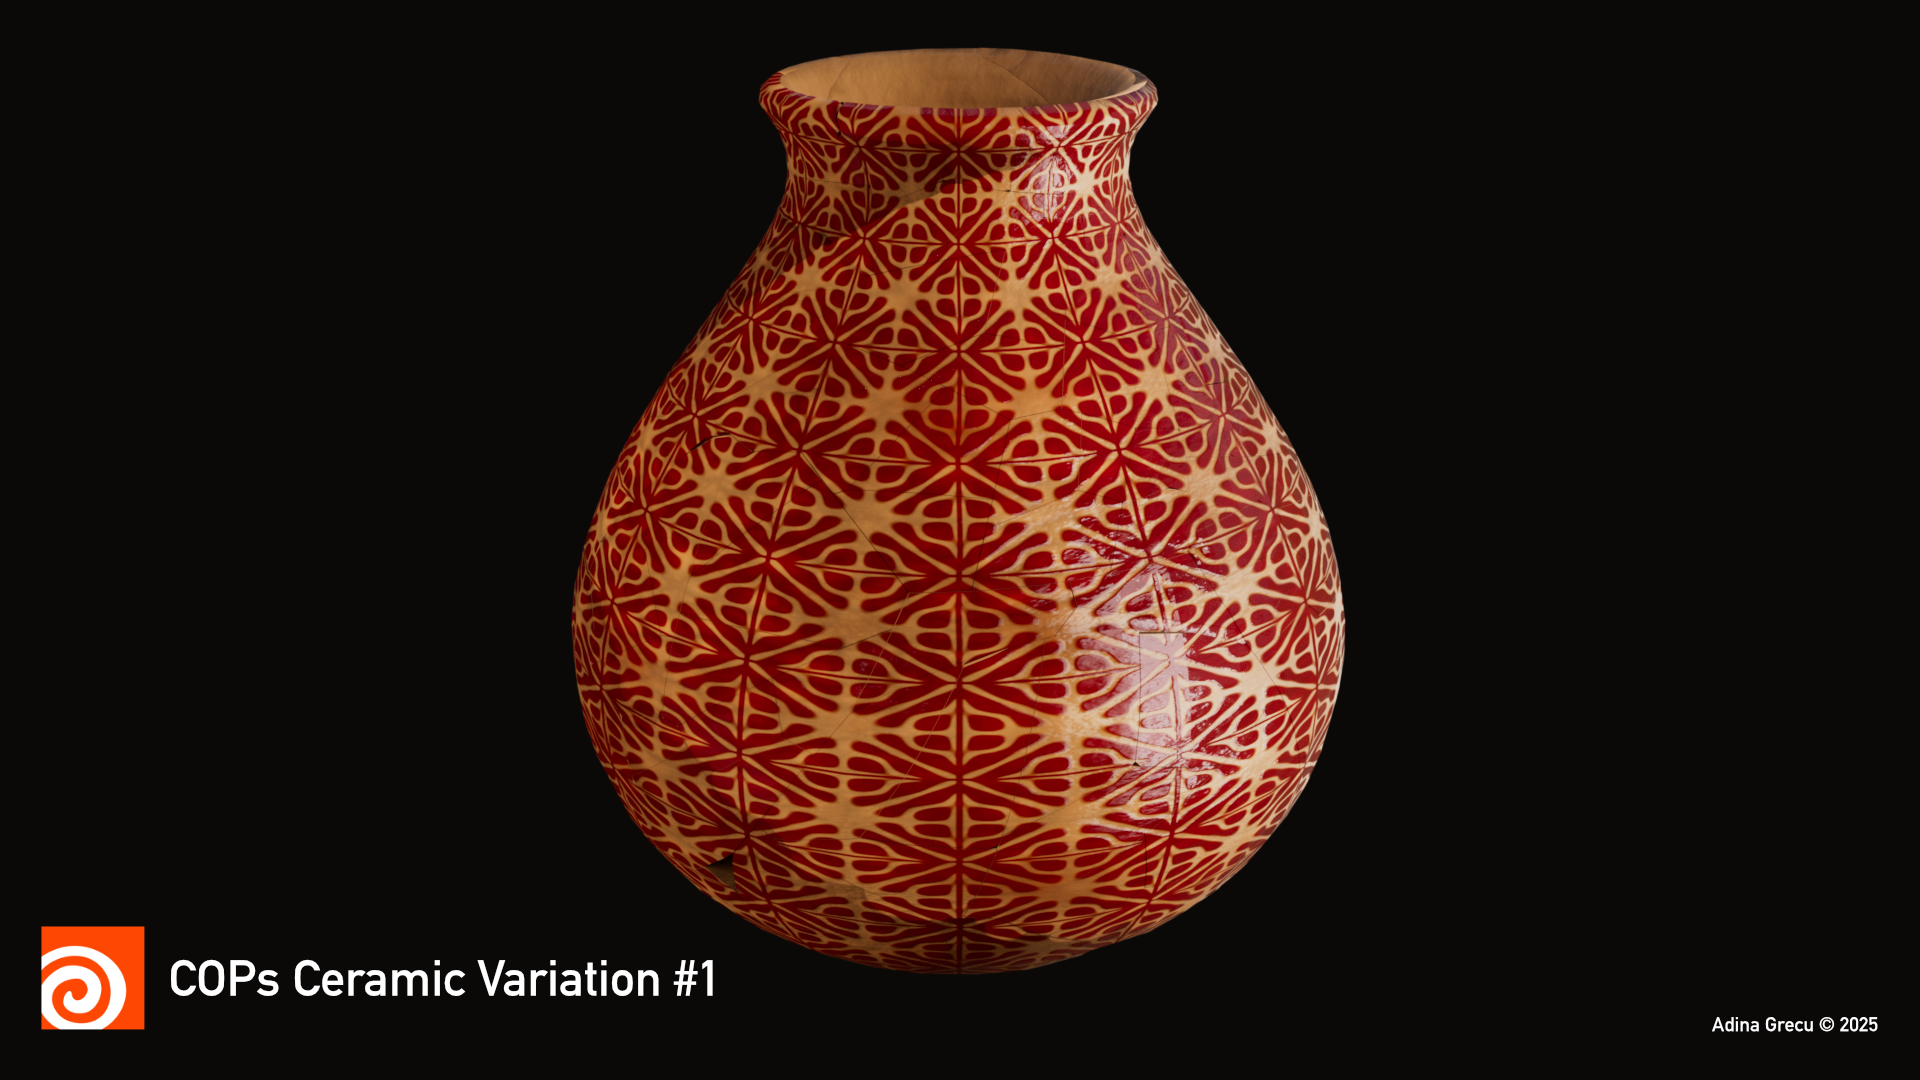
For the colour of the ceramics I focused on maintaining high contrast, which will later aid in visually separating the glazed and the unglazed parts. For this particular piece with a photorealistic look, the unglazed parts are a warm ochre (most resembling fired clay) and the glazed bits are dark red. The two colours, used with a multiply node and masked with some of the previous noises, create a well-defined pattern.
I use plenty of monotorgb and invert nodes to drive the next component – for people familiar with node based material systems (like Substance Designer) this is not a new concept.
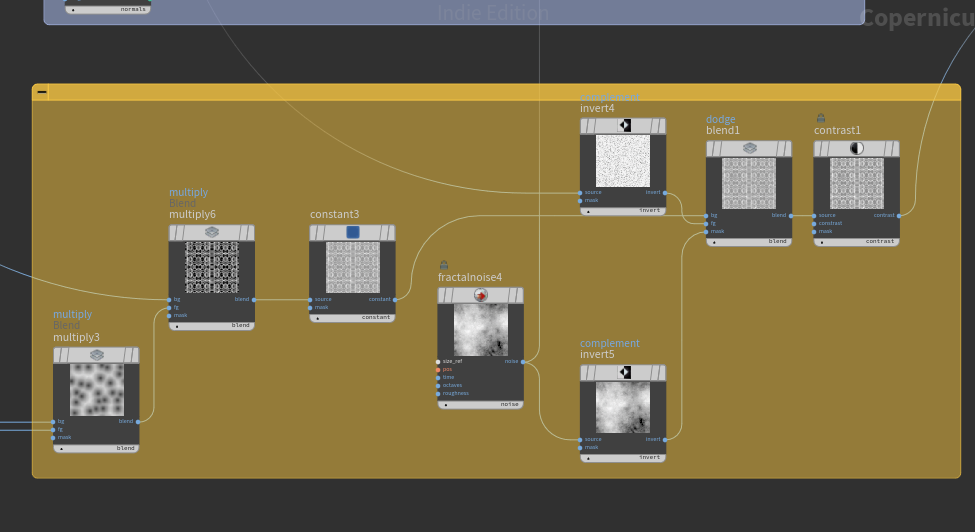
The roughness makes heavy use of the initial tiled pattern too – the unglazed groves should have almost no specular, while the glazed parts should have much higher specular. Combining those maps with extra noise creates some 'dirt' patches which break up the specular on the glaze.
The normal map I left last. It uses the same initial chladni pattern and most of the noises connected to the colour and roughness texture maps. I wanted the glazed part to be protruding, but not have as much surface noise as the rougher portions. If you look at a glazed piece of ceramic, it is usually pretty smooth, except for maybe a few defects.
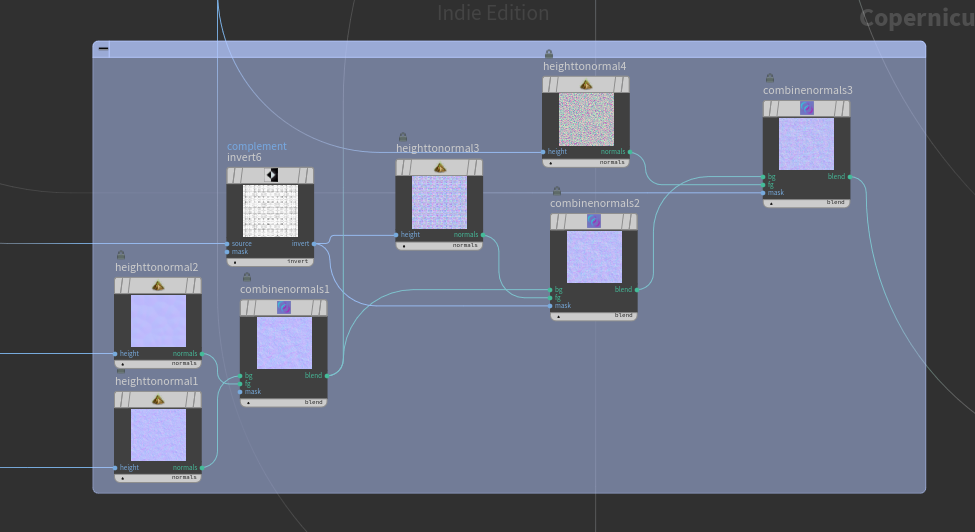
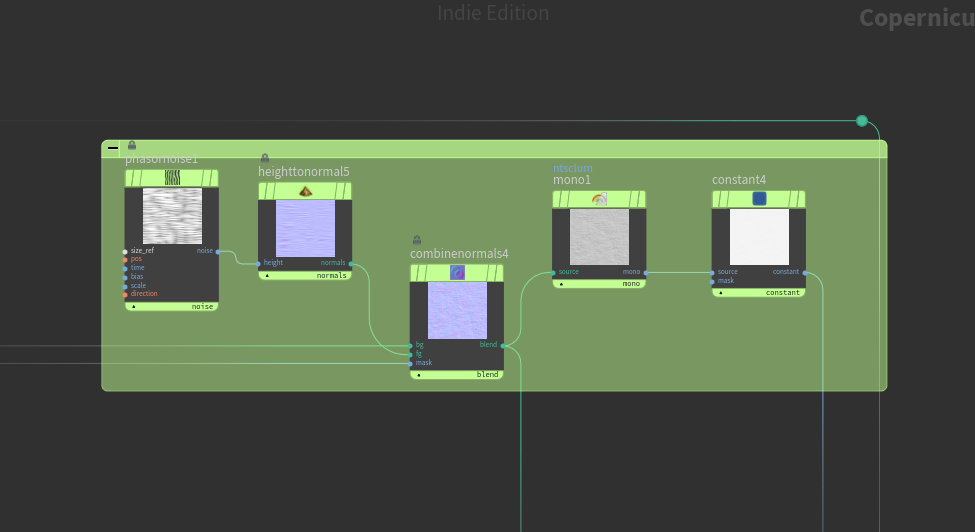
Lastly, I branched off from the colour nodes to create the roughness and normal maps for the unglazed material. It has virtually no specular and has an added phasornoise to create striations similar to those left behind when wheel-throwing ceramics.
With all texture maps finished, I can visualise the material with a previewmaterial node, where all the textures can be connected. Since I imported my geometry, I can also connect that and see the material straight on its intended mesh. The previewmaterial node can be copied in the texture path of a uvquickshade node preceded by op: to preview the material in the object viewport outside of the COPs network context. This is quite useful for visualising a scene with multiple objects.
From here, each texture node is connected to a null node as output and then exported via a ropimage node. Once written to disk, the image textures can be used to create materials with MtlX Standard Surface or Principled Shader. I tried both to render with KarmaXPU and while I thought the mtlx looked a little bit better specular-wise, they both rendered just fine. I did a few render tests with the mesh and exported textures in Blender and they looked nice, but in the end I decided to stick to Solaris so that I would have a workflow with less context switching.
Thoughts and some wrap-up
For quickly setting up a project like this, Copernicus provides a great material workflow inside Houdini, especially when modeling things procedurally. In this case, I thought ceramic work lends itself well for both workflows – I could get multiple material variations extremely quickly just by modifying the colours and playing with the tiling pattern.
I think the strength of COPs lies in not having to switch between Houdini and another material authoring software, making for very efficient iterations and responsive, almost real-time visualisation of said materials.
'Till next time!
. . .
Houdini 21.0 already introduced a baking node in Copernicus, however I couldn't get it to bake from high-poly to low-poly with textures made in Copernicus. I will try again in the future, but so far I couldn't get the same functionality I would have with xNormal where I can also bake the basecolour alongside the normal, roughness, AO etc..